
Masnagj WIP Thread.
Forum rules
Post pictures and discussions regarding works in progress here, please. If you have photos of these works when they're completed, feel free to post them to the right section and feel free to add the link in your post about the work in progress.
Post pictures and discussions regarding works in progress here, please. If you have photos of these works when they're completed, feel free to post them to the right section and feel free to add the link in your post about the work in progress.
-
Cyberpaddy66
- Posts: 680
- Joined: 3 Jun 2008, o 13:22
- Location: Cornwall :D
- Contact:
That's quite a bit better than the original pic, I do believe a few highlites will soften the orange look and finish that face nicely but well done so far
Getting back into the thick (or rather thin as in thinning my paints) of it, not picked up a brush in some time so this may hurt a bit until I get used to the feel of them again 
-
Masnagj
-
Cyberpaddy66
- Posts: 680
- Joined: 3 Jun 2008, o 13:22
- Location: Cornwall :D
- Contact:
Personally I'd go with a more lighter shin-tone on the forehead and nose to give the face a focal shine but I'll let the others convince you of the way forward.
Getting back into the thick (or rather thin as in thinning my paints) of it, not picked up a brush in some time so this may hurt a bit until I get used to the feel of them again

Great improvement! I think the colors are much richer and they became much more interesting thanks to the additional tones you used.
I think you need to use less colors of lower intensity, or mix them with flesh tones. I think it will come with practice.
I'd use glazes of ivory/bleached bone to highlight the parts where direct light falls - like forehead, the nose, upper parts of cheeks, etc.
So first apply thin glazes of skin colors to tone the extra colors a bit, and then highlight.
Definitely much more interesting now anyway
I think you need to use less colors of lower intensity, or mix them with flesh tones. I think it will come with practice.
I'd use glazes of ivory/bleached bone to highlight the parts where direct light falls - like forehead, the nose, upper parts of cheeks, etc.
So first apply thin glazes of skin colors to tone the extra colors a bit, and then highlight.
Definitely much more interesting now anyway
-- Mahoń

Back in the garage with my bullshit detector
Back in the garage with my bullshit detector
-
Masnagj
Thanks Mahon, I apreciate the input on that, I will give that a shot! As I was waiting for advice on what to do with the sgt. I tried a to do a bit more glazing just so I would have more practice with the technique. Here was the result.
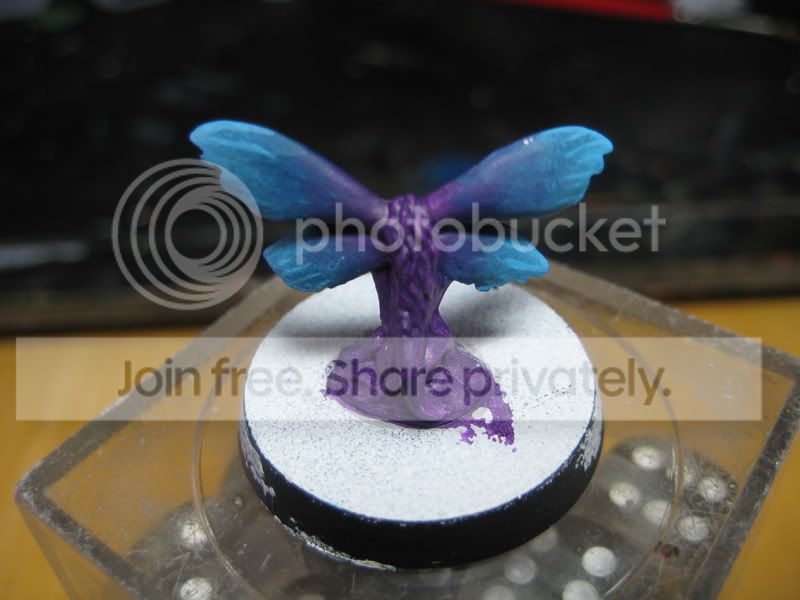 Click to see full-sized image
From Liche Purple to Hawk Turquoise, highlighted with Ice blue.
As always I am still learning how to glaze things well, if there are any pointers you could throw my way to improve the result please feel free.
Also CP, please dont sell yourself short friend advice from any source is apreciated and is always taken into consideration.
Click to see full-sized imageFrom Liche Purple to Hawk Turquoise, highlighted with Ice blue.
As always I am still learning how to glaze things well, if there are any pointers you could throw my way to improve the result please feel free.
Also CP, please dont sell yourself short friend advice from any source is apreciated and is always taken into consideration.
-
Cyberpaddy66
- Posts: 680
- Joined: 3 Jun 2008, o 13:22
- Location: Cornwall :D
- Contact:
If you really want my advice and lets be honest here I'm still learning these techniques as well so take it with a pinch of salt...
The blending is looking nice but I can still see bits on the wings where the colour jumps from one to the other, I believe you have the method pretty much sorted but the actual transactions need to be a little bit smoother, possible with more yet thinner coats of paint and alwasy going from the original colour to the point you want the new colour.
How many coats of blue did you do to cover the purple?
The blending is looking nice but I can still see bits on the wings where the colour jumps from one to the other, I believe you have the method pretty much sorted but the actual transactions need to be a little bit smoother, possible with more yet thinner coats of paint and alwasy going from the original colour to the point you want the new colour.
How many coats of blue did you do to cover the purple?
Getting back into the thick (or rather thin as in thinning my paints) of it, not picked up a brush in some time so this may hurt a bit until I get used to the feel of them again
it's all about how many layers you want to apply, how hin you want your paint to be.
for example the templar you could see in my WIP thread was pretty quickly painted. general paintjob on the back of the cloak was done in 10 minutes or so. then I was improving it for no more than half an hour, probably less. I was aiming for a quick effect so I decided to accept some imperfections.
the same goes for painting armies - you can accept more imperfections than on single models. after all you're aiming for a 'group effect'.
I see you learned the technique and now it all comes to time, patience, and practice...
for example the templar you could see in my WIP thread was pretty quickly painted. general paintjob on the back of the cloak was done in 10 minutes or so. then I was improving it for no more than half an hour, probably less. I was aiming for a quick effect so I decided to accept some imperfections.
the same goes for painting armies - you can accept more imperfections than on single models. after all you're aiming for a 'group effect'.
I see you learned the technique and now it all comes to time, patience, and practice...
-- Mahoń
Back in the garage with my bullshit detector
Back in the garage with my bullshit detector

-
Masnagj